Recording, Mixing and Mastering
Published on 07/06/2022
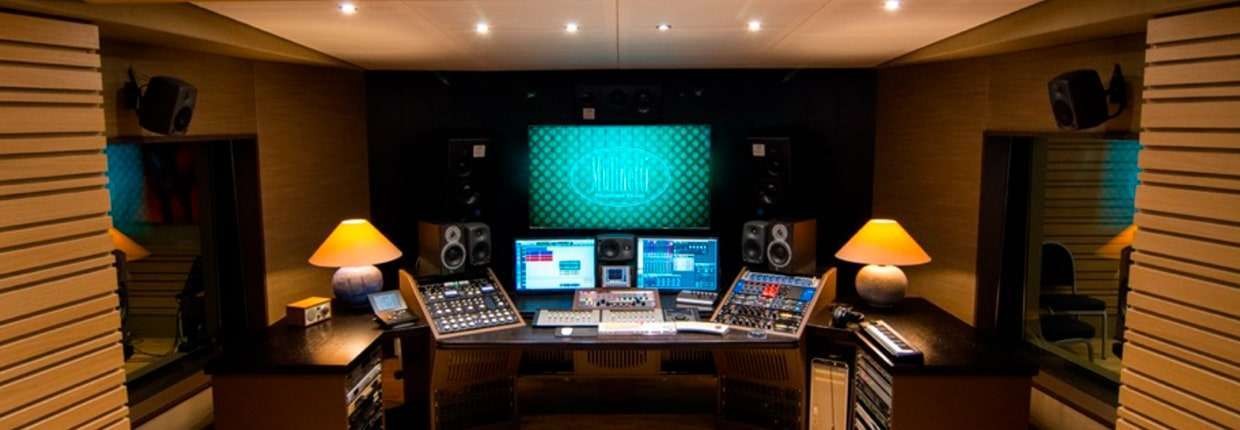
A few weeks ago we talked about how to choose studio monitors and how this choice is bound with the studio acoustic.
When we are in a closed environment several issues have to be taken into account since they have a great impact on the final result.
Let’s see which are the main topics to account for to get a satisfying and professional listening environment.
The sound travels via the pressure waves that make the pressure change ove time and space.
At room temperature the air propagation speed (v) is 343 m/sec (almost).
The wave length (λ) is linked to the frequency (f) and the speed by the relation:
λ*f = v
In a closed room the waves get reflected by the walls and this creates energy sums and differences that have a big influence in the sound perception.
When a wave hits an obstacle the energy is transferred according three mechanisms:
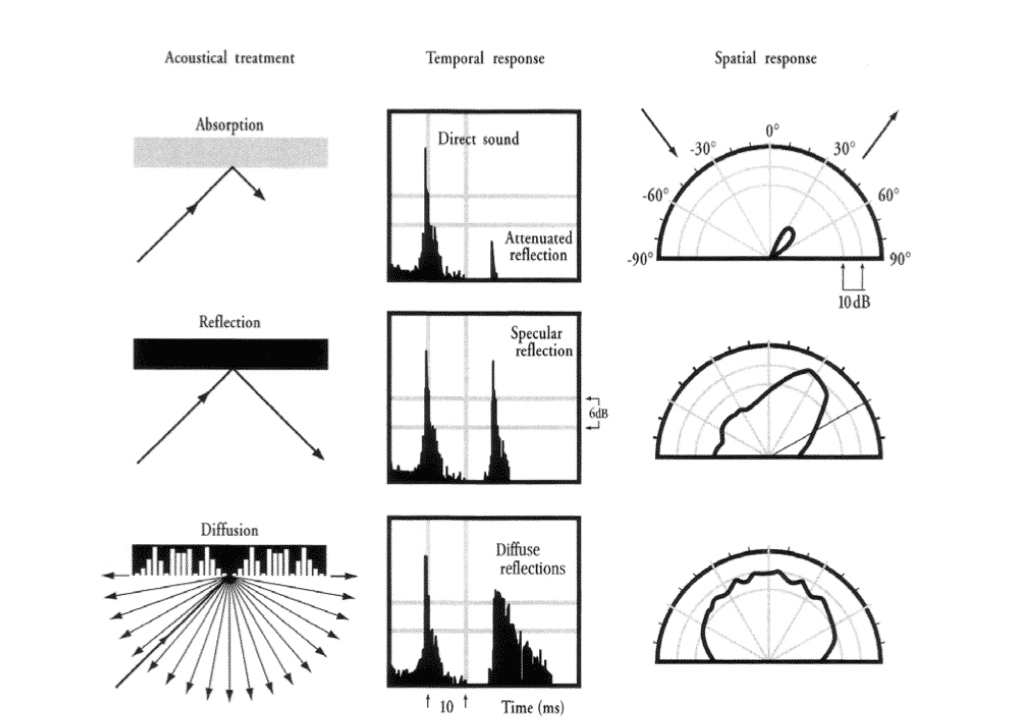
The combination of those three modes yields the complexity of the air flows and generates standing waves capable of enhancing or attenuating the response in certain regions of the room.
What the listener perceives is a combination of direct sound(coming straight from the source), early reflections (the first reflected waves reaching the listener) and reverb(coming by the combination of diffusion and attenuation of the intensity while the waves travel within the room).
Early reflections and reverb get to the listener after a certain time delay.
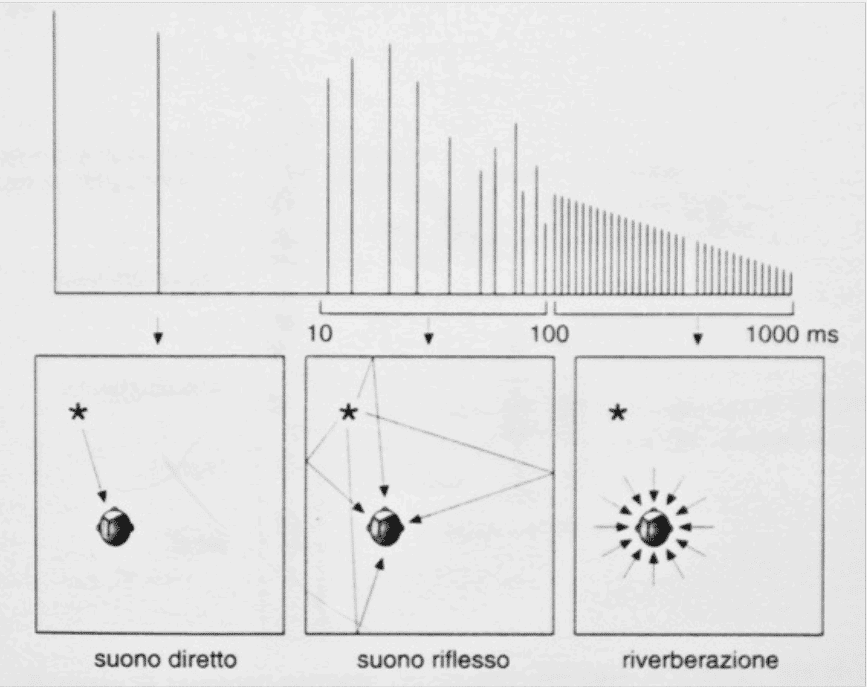
As one can easily understand, all those events are capable of greatly influencing sound perception.
Audio professionals are then required to operate in environments that allow them to have a reliable listening experience to make themselves capable of taking the right decision while processing audio.
The topic has been studied for a very long time (think about Greek and Roman theaters) and the solutions are several. The main objectives are:
The professional organizations (AES, ISO, ecc) have managed to define the parameters to consider and the related spec limits.
The topic is not a simple one. The most commonly addressed issues are related with reverberation time and frequency response.
Things are more complex but a detailed discussion goes well over the objectives of this post.
You may want to check the Sound Studio Service specific page which is, by the way, the source from where we have got all the discussed information and references.
In that website you will find a lot of interesting material about the acoustic treatment of music studios.
The parameter defined to measure the reverberation time is defined as RT60 which is the time needed for a signal to attenuate 60dB from the starting value at the source.
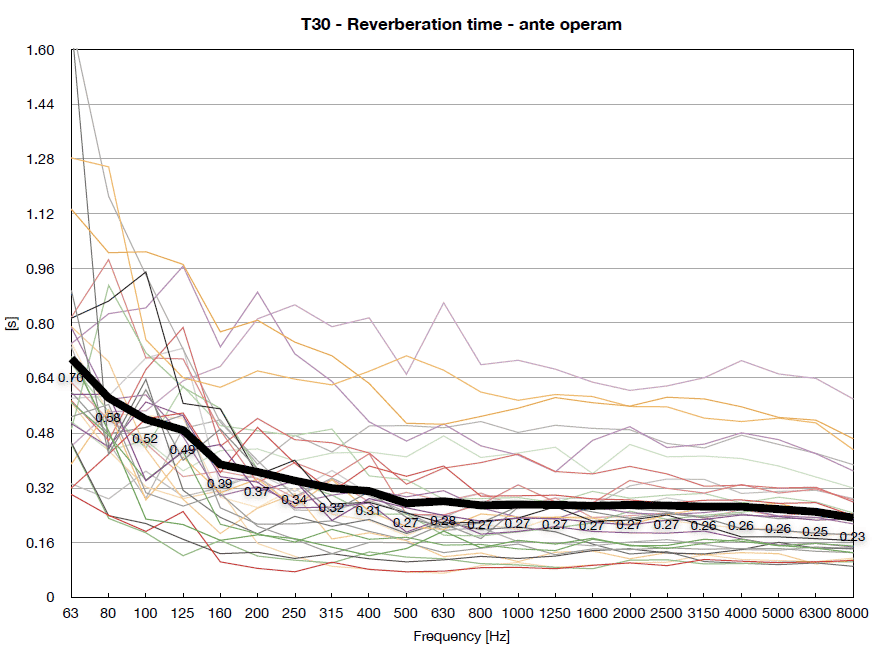
As you can see from the picture the reverberation time varies with frequency and is higher at lower frequencies.
The frequency response should be uniform over the entire audio band. This is unfortunately influenced by:
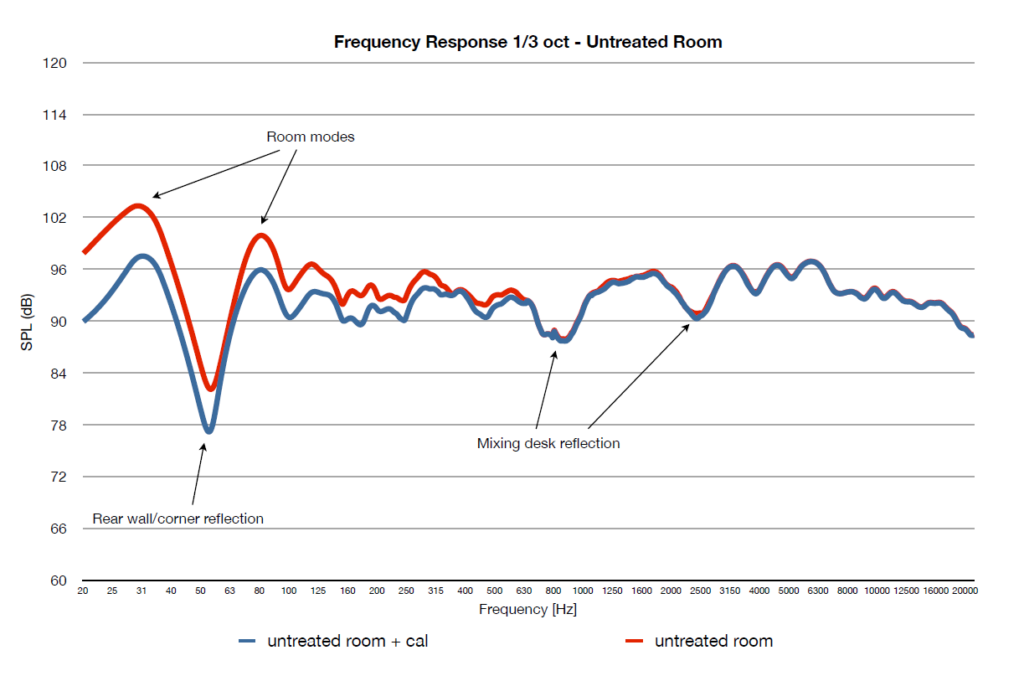
In the picture you can see the effects of the standing waves (room modes), of the walls (rear wall/corner reflection) and of the console (mixing desk reflection).
Going over RT60 and frequency response, following topics are addressed by the acoustic treatment:
The steps to reach all the previous objectives are:
To get all things done is not simple and it is a lot better to reach for the help of qualified professionals in the field.
Acoustic isolation is aimed to avoid the sound propagation outside of the studio's facility.
The reason is to avoid interferences among different operators and to avoid disturbing the neighborhoods.
Acoustic isolation is realized via high insulating capability structures.
It is important to understand that the sound leaks over a wall for direct transmission as well as via lateral transmission using the joint mechanisms and infrastructures.
High density materials are required to insulate as energy absorption is given by the mass. The energy absorption is also dependent on frequency.
When getting close to the system’s resonant frequency the insulating capability decreases.
The choice of the materials is then to be made considering also the resonant frequencies.
It is better not to use hard materials and bind the components with uncoupled joints to increase the dampingcapability.
Sound isolation is symmetrical and it is so useful also to protect from external noise.
The facility selection is a good first step for acoustic treatment. Cubical rooms are the worst as they increase the standing waves effect.
Elliptical and spherical spaces are also to be avoided since they allow for energy concentration in few points (the foci).
Studios are typically installed into rectangular shaped rooms. Doors and windows are better placed on the back of the listening point. Glass walls should be placed in order to avoid reflections toward the listener.
The speaker positioning is also fundamental for the whole project to be effective.
The speakers are to be installed in the short side of the room and the listening point has to be placed at one third of the room’s length.
Surround or Dolby Atmos speakers must follow the spec given by the respective standards.
It is worth to mention that the distance between the speakers and the walls creates reflections. The interference between direct and reflected waves create peaks and nulls on given frequencies. For this reason Far FIeld monitors have to be flush mounted.
Given the increased quality of big monitors also at low volume in the last decades this is no longer a problem.
Near Field and Mid Field monitors are still valid and widely used.
Every system has pros and cons so, very often, multiple speakers configurations are used.
Acoustic treatment in a strict sense comes once that spaces and speakers have been defined.
Several methods have been defined over the years.
The LEDE (Live End Dead End) uses an absorbing front (Dead End) and a live but diffused back (Live End). The technique was developed in 1979 aiming to reduce the first reflections and get the focus to the sound coming from the monitors.
A second approach is defined as RFZ (Reflection Free Zone). With this design the listening position is kept free of reflections. . The method is from 1984. It works well over 500 Hz, a lot less with lower frequencies.
In 1991 the Non-environment method was introduced and it is still the state of the art.
This method uses 2 reflective walls (the front and the floor) and all the rest treated with wideband absorbers capable of managing very low frequencies.
Diffusers for highs and mid-highs on the sides and on the back give a more natural listening experience.
This methodology is actually considered to be the most effective.
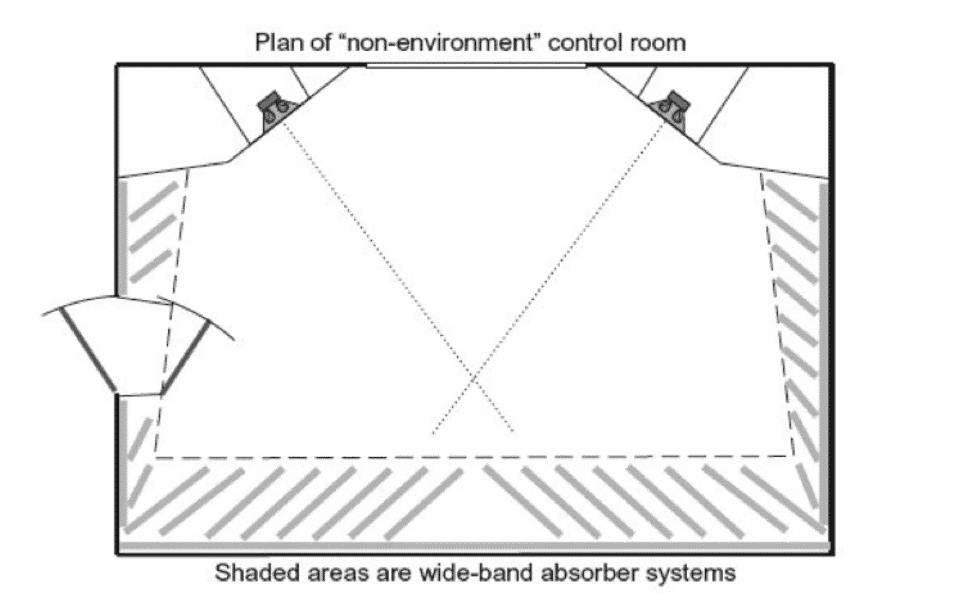
The following picture shows how the walls and the ceiling are treated with wideband absorbers and diffusers as per the Non-environment design principles.
The absorbers to get to the lower frequencies have to be physically wide. The diffusers have to be designed to operate over the selected frequency bands.
The designer can use simulation tools and test equipment to design first and to check later and be sure that everything goes as expected.
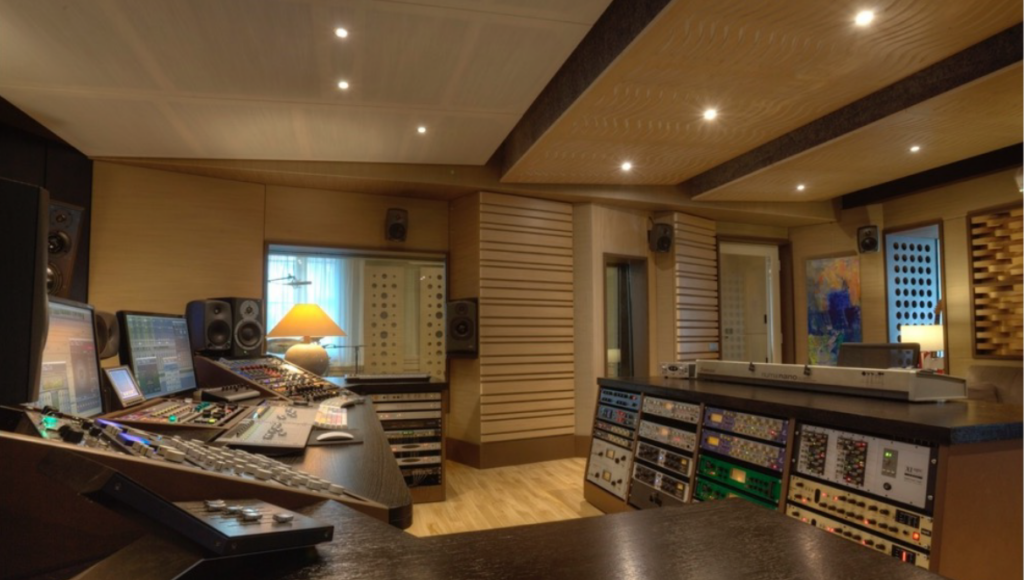
A good acoustic treatment improves all the objectives listed above.
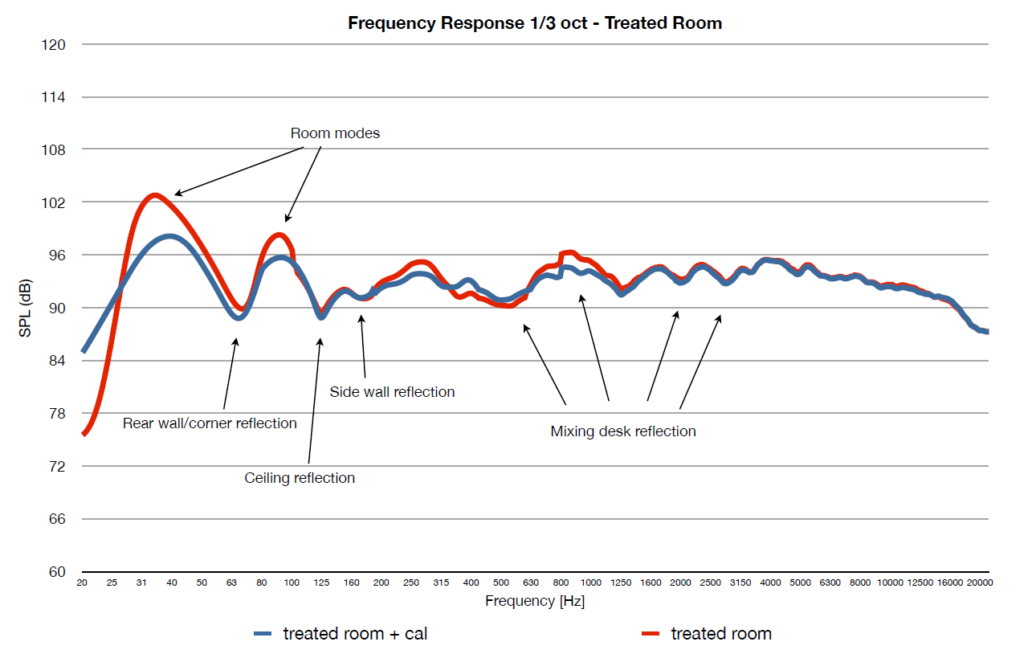
Further enhancements can be given by the usage of electronic calibration systems that are more effective when installed in treated environments.
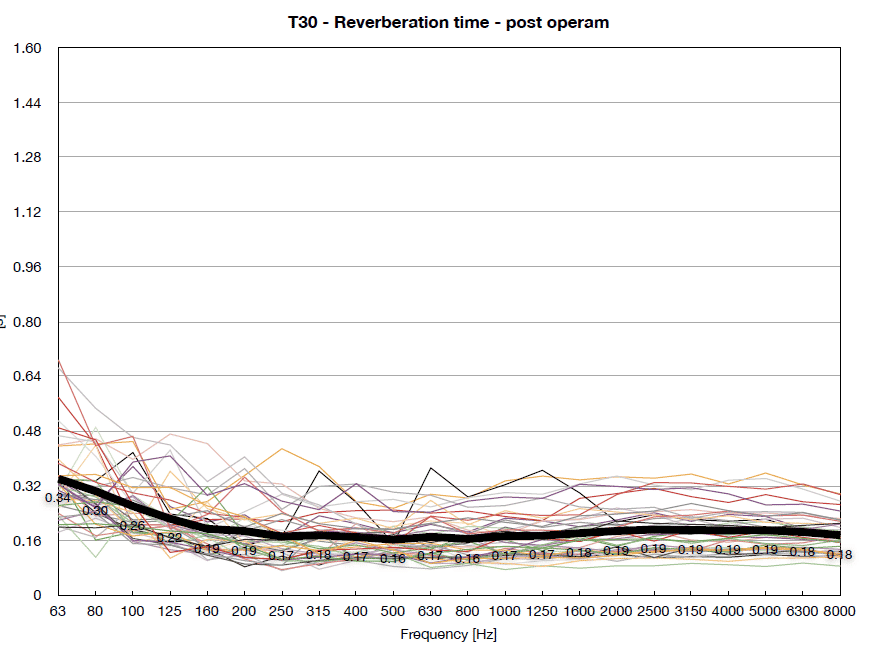
To close the section let’s give a look, in the following pictures, to the effects of the acoustic treatment on the frequency response and the reverberation time of the room.
The same principles apply to the tracking rooms but the design criteria often depend on the owner's taste.
Techniques and tools are the same as those for the control rooms but the results are very different case by case.
Typical situations are:
We don’t go further here given the variability of the requirements.
It should be now clear that a proper acoustic treatment is a professional thing.
The several proposed solutions for home studios help but don’t clear the biggest issues.
As always happens in the audio world, high quality results imply investment, skills and professional approach.
Join us today and get 5% off your next order!

Empty cart